Widget Rules
Discover rules you can use to customize your Modern Chat experience
Rules determine when the Modern Chat Widget appears on the page. You may not want every visitor to see the widget on every page and in every circumstance.
Let's say you want your Modern Chat widget to appear only when a visitor has arrived at the support area of your website. This would be something you configure here as a rule.
You can take this a step further by adding additional rules to the same widget that follows AND and OR rules to further refine when the widget does (or does not) appear.
This isn't just limited to rules that are included with Modern Chat. You can even add custom rules such as only showing the Modern Chat widget when items are in the visitor's shopping cart.
Here is a quick list of available rule conditions available out-of-the-box:
- Authentication Status
- Browser
- Business Hours
- Cookie
- Days Since Last Visit
- Device Type
- IP
- Location City
- Location Country
- Location State
- Operating System
- Page Visits
- Previous Page
- Referrer
- Scroll Percentage
- Site Visits
- Time on Page (seconds)
- Time on Site (seconds)
- Url
- Url Host
- Url Path
- Url Param
You can find additional information about rule configuration in Khoros Atlas.
Example 1: Display the Widget when Items are in the Cart
In the Widget Display Conditions section, we went over how to create a custom condition out of a selector.
In this example, we will put that custom condition to use as we set up a new rule that initiates chat if the customer has two or more items in their cart.
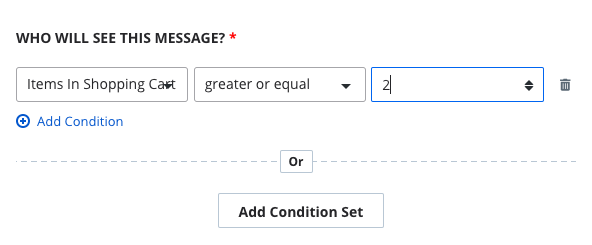
In the Who Will See this Message area of the rules page, we select the Items in Shopping Cart query selector we set up earlier, the operator to greater or equal, and the value to 2.

The custom variable is evaluated on the brand's website around once per every five seconds. This means that the value of what is returned by the CSS (query) selector changes over time and will be evaluated once per polling interval.
Example 2: Display the Widget in the Site's Support Area
In this example, we will create a rule that displays the Modern Chat widget when visitors enter a support area of the website. In this case, we want to display the widget on any page that has the word support in its URL.
This is one way to provide an additional level of support to end-users and having it in a rule allows you to set a custom greeting and apply a theme to the widget that best matches the support area of your site.
- Go to Admin > Brand Messenger > Modern Chat.
- Select the Widget you want to configure the new rule for.
- Click New Rule.
- Enter a name for the rule.
- Select a theme. The rule defaults to the theme inherited by the widget.
- Enter a message to be displayed when the chat is opened.
- Select a prechat form (if applicable).

- Select Add Condition.
- Using the dropdown, select Url.
- In the center field, select Contains.
- In the right (value) field, enter support.
- Click Save.

- On the Modern Chat page, switch the Activate toggle ON to activate the rule.
- Click Publish to publish your changes.
By default, new rules are set to OFF in order to provide an extra barrier against premature activation of rules once added. The step to activate the new rule by switching the toggle switch to the ON position is required to start using the newly-published rule.
Activate and Deactivate Rules

As we covered in the last section, activating a rule is as simple as toggling the activate toggle to its "on" position. In the image above, you'll see that our two rules for this widget are both activated and actively being applied to the widget.

You can deactivate a rule to keep it in place without actively applying it to the widget for a time by simply sliding the toggle switch to the "off" position.
Once you do this, a notification will appear letting you know that you have unpublished changes. Hitting the Publish button will lock those changes in and actually lock in the rule's deactivation.

Once you've hit the Publish button, an additional notification will appear to let you know your changes have been saved and the new rule configuration is applied.
Order Rules
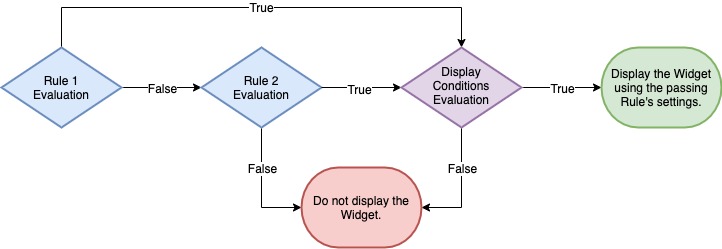
Rules appear in the order in which they are applied against the widget. Each rule is checked to see if its criteria apply to the page. The first rule to evaluate true is the one used to present the widget to the end-user.
Here is a diagram describing how rule ordering determines the widget's settings.

Now, we'll take a look at how this works in the administrator.

You can change the order by which rules are applied by dragging them and dropping them into place on the widget's rules page. As indicated by the icons on the left of each row, you can drag and drop these rules to whatever order you want them to be in.
Updated almost 2 years ago