Enable Push Notifications
Enable push notifications for Brand Messenger Legacy on iOS
The SDK supports Apple Push Notification service (APNs). See Apple's Registering your App with APNs documentation to learn about the service and requirements for implementation.
Enable push notifications in your development and production environments. APNs requires a digital certificate in the form of a .p12 file.
We recommend creating separate certificates for each environment.
To get started with remote notifications, you'll need to:
- Enable remote notifications in Xcode
- Enable push notifications in the Apple Developer Member Center and generate your digital certificate (.p12 file)
- Send your .p12 file to Khoros Support
- To send this file, create a new Support Ticket and add ".p12 File Attached" in the ticket's Subject line.
- Recreate your Provisioning Profile
We strongly recommend utilizing information in Apple's documentation for updated information on configuring your app to receive and handle the notifications.
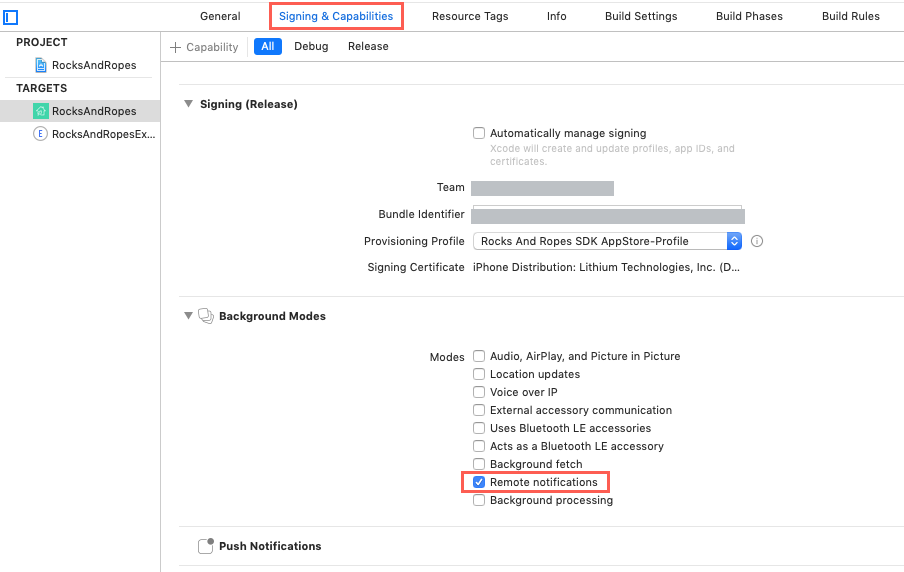
Enable Remote Notifications in Xcode
Enable Remote Notifications for your app Target in Xcode in Target > Signing Capabilities > Background Modes.

After push notifications are enabled in XCode, enable push notifications in the Apple Developer Member Center and generate your .p12 digital certificate.
Enable push notifications in the Apple Developer Member Center
- Log into the Identifiers section of the Apple Developer Member Center and select your app.
- Click Edit
- Enable Push Notifications
- Click Create Certificate
- Follow the instructions to generate a certificate signing request using Keychain Access.
- Once the certificate is ready, download it to your computer and double-click it to open it in Keychain Access.
- Right click on the certificate you created, and select Export 'Apple Development IOS Push Services:…'
- Production-environment certificates are called 'Apple Push Services:...'
- Save the .p12 file to your computer.
- Send the .p12 file to your Khoros Support using a new Support ticket with
.p12 File Attachedin the ticket's Subject line. - Support will upload the certificate to your iOS app configuration.
- Recreate your provisioning profile as described in the next section.
After push notification enablement, refer to Apple's documentation to register your app to receive and handle notifications in your app.
Recreate Your Provisioning Profile
Now that you've enabled push notifications for your app, you must create a new Provisioning Profile in the Apple Developer Member Center. You cannot use an earlier version.
- Go to Provisioning Profiles in the Apple Developer Member Center.
- Click the + icon to add a new provisioning profile and follow the on-screen instructions.
- After you create the new provisioning profile, the profile shows that Push Notifications is an enabled service. Download the new profile.
- Double-click the downloaded profile to install it.
- It should now be available in Xcode for your app.
- Build your app.
Updated almost 2 years ago