Authentication and Authorization in Android
Learn about authentication using the Brand Messenger Android SDK
This section will guide you in authenticating users for the pre-built customizable chat UI in your Android app which can be a Java or Kotlin android project.
SDK Initialization
Prior to sending the first message, the user requires authentication. This is a two-step process.
First, initialize the SDK with the Company Key and App ID as shown below. Contact Khoros Support for your Company Key and App ID if you do not have them.
Even before initializing the SDK, there are a few URLs that can be set by the user. For example:
Initialize the SDK using the Company Key and Application Id:
BrandMessengerUserPreference.getInstance(this).setUrl("your-base-url");
BrandMessengerUserPreference.getInstance(this).setCustomAuthHandlerUrl("auth-handler-url");
These URLs are region based. A list of URLs depending on regions is listed below:
For US region ->
Base URL: brandmessenger.usw2.khoros.com
Auth-handler URL: messaging-auth.usw2.khoros.com

For Europe region ->
Base URL: brandmessenger.euw1.khoros.com
Auth-handler URL: messaging-auth.euw1.khoros.com

For APAC region ->
Base URL: brandmessenger.apse2.khoros.com
Auth-handler URL: messaging-auth.apse2.khoros.com
The SDK will authenticate with Khoros Auth Handler endpoint during login. Depending on the region, the customer can optionally set the region. Options are "US", "EU" or "APAC". Default is "APAC" when not set.
BrandMessengerManager.setRegion(context, "US");
BrandMessengerManager.setRegion(context, "US")
Then, initialize the SDK with one of the two methods below:
BrandMessengerManager.init(this, BrandMessenger.getInstance(this).getCompanyKey(), BrandMessenger.getInstance(this).getApplicationKey());
// Or if you do not have the application key or want to use widget configuration in the SDK
BrandMessengerManager.init(this, "companyKey", "", "widgetId", new KBMCallback() {
                @Override
                public void onSuccess(Object response) {

                }

                @Override
                public void onError(Object error) {

                }
});
BrandMessengerManager.init(context, BrandMessenger.getInstance(context).companyKey, BrandMessenger.getInstance(context).applicationKey)
Note
User logins are persistent. Once a user is logged in, they won't be required to log in again until and unless they have logged out.
Widget-id can also be set manually using
BrandMessengerManager.setWidgetId("<WIDGET-ID>");.
Checking login status
You can check if the user's login status to Brand Messenger using the following:
if (BrandMessengerManager.isAuthenticated(context, false)){
  //do something
}
if (BrandMessenger.isAuthenticated(context, false)) {
    //do something
}
Depending on the integration, the SDK provides various ways of logging in.
Login using access-token
Here is how to log in to Brand Messenger using an access token:
BrandMessengerManager.login(context, "access_token", new KBMLoginHandler() {
    @Override
    public void onSuccess(@NonNull RegistrationResponse registrationResponse, @Nullable Context context) {
    }
    @Override
    public void onFailure(@Nullable RegistrationResponse registrationResponse, @Nullable Exception exception) {
    }
})
BrandMessengerManager.login(context, "access_token", object : KBMLoginHandler {
    override fun onSuccess(registrationResponse: RegistrationResponse, context: Context?) {
    }
    override fun onFailure(registrationResponse: RegistrationResponse?, exception: Exception?) {
    }
}
Login using jwt-token
Generating jwt-token requires API_KEY_ID and API_KEY_SECRET which can be requested by contacting Khoros support.
As this required API_KEY_SECRET, JWT token should be generated on a server instead of being included in the application. The app then can make an API request to fetch the jwt-token and login.
Example of generating jwt-token in java:
final Map<String, Object> customProperties = new HashMap<>();
customProperties.put("userId", userID);
customProperties.put("scope", "appUser");
customProperties.put("platform", "android");
customProperties.put("givenName", loginName);

try {
    String jwtString =
    Jwts.builder()
        .addClaims(customProperties)
        .setHeaderParam("kid", API_KEY_ID)
        .setHeaderParam("typ", "JWT")
        .setIssuedAt(new Date(1420070400000l))
        .signWith(SignatureAlgorithm.HS256, API_KEY_SECRET.getBytes("UTF-8"))
        .compact();

    return jwtString;
} catch (UnsupportedEncodingException e) {
    return "There was an error while generating Smooch JSON Web Token";
}
The jwt-string then is used for login
BrandMessengerManager.loginWithJWT(context, jwtString, userId, new KBMLoginHandler() {
    @Override
    public void onSuccess(@NonNull RegistrationResponse registrationResponse, @Nullable Context context) { }
    @Override
    public void onFailure(@Nullable RegistrationResponse registrationResponse, @Nullable Exception exception) { }
});
In the event that this is a new user, a new user account is created. Existing users are logged in to the application.
To set the user attributes, see Set User Attributes in Android.
You can perform further actions based on the callback methods. In onSuccess you could launch the chat screen for the user, onFailure you could throw some error message based on the exception and the response received in the callback method.
Login as anonymous user
Business may want to let users access chat before logging into their application. The SDK provides login as anonymous users, which can be merged into authenticated users later in the flow.
if (BrandMessengerManager.isAnonymousUserExpired(context)) { // check if a valid anonymous user exists.
    BrandMessengerManager.loginAnonymousUser(context, loginCallback); // login as anonymous user
}
...
/* Login from anonymous user to authenticated access-token user */
BrandMessengerManager.login(context, "access-token", loginCallback); // Login as normal to merge anonymous user's chat history to authenticated user
// or
BrandMessengerManager.login(context, "access-token", false,  loginCallback); // Customer can opt to not merge chat history of an anonymous user

/* Login from anonymous user to authenticated jwt-token user */
BrandMessengerManager.loginWithJWT(context, "jwt", "userId", loginCallback); // Login as normal to merge anonymous user's chat history to authenticated user
// or
BrandMessengerManager.loginWithJWT(context, "jwt", "userId", false, loginCallback); // Customer can opt to not merge chat history of an anonymous user
Note
You need to call the login method only once. However, the method internally checks if the user is logged in, if the user is already logged in you would still receive the
RegistrationResponseinonSuccesscallback with a "User already logged in" message.
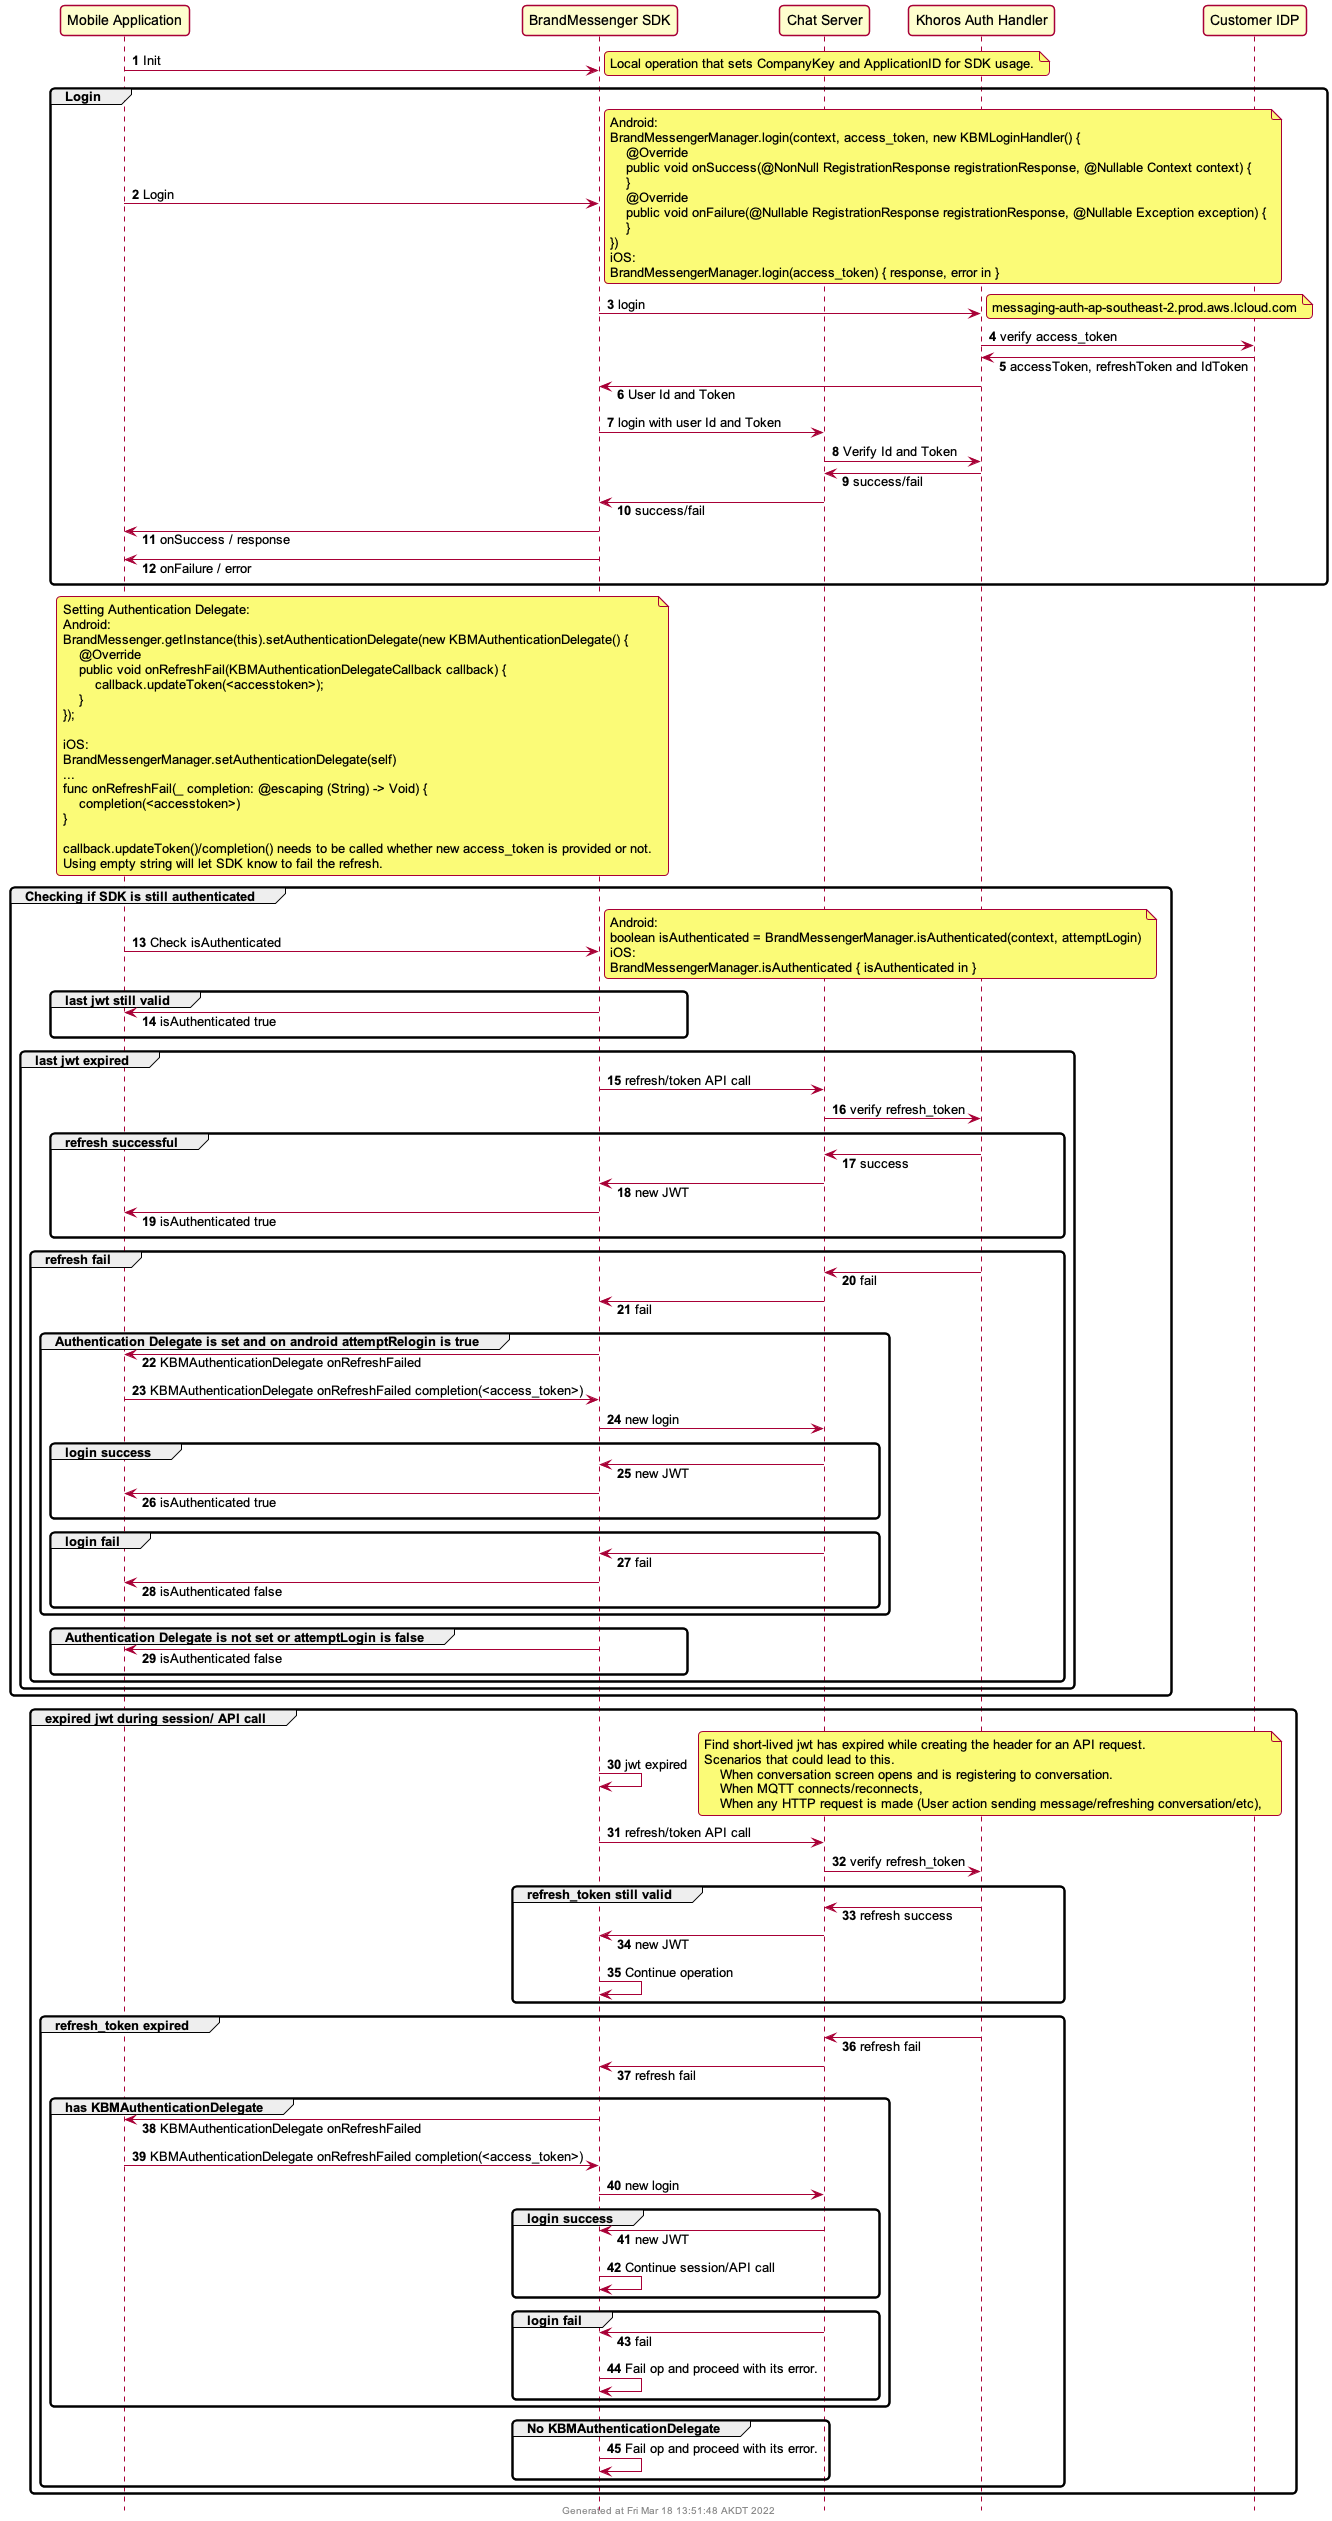
Authentication Delegate
When the auth token expires and SDK's refresh/token API fails, the sdk offers a way to re-establish login auth during operation via a delegate object.
Access-token login authenticationDelegate
BrandMessenger.getInstance(context).setAuthenticationDelegate(new KBMAuthenticationDelegate() {
    @Override
    public void onRefreshFail(KBMAuthenticationDelegateCallback callback) {
        callback.updateToken(<accesstoken>);
    }
});
BrandMessenger.getInstance(context).setAuthenticationDelegate { object: KBMAuthenticationDelegate {
    override fun onRefreshFail(callback: KBMAuthenticationDelegateCallback?) {
        callback?.updateToken(<accesstoken>)
    }

}}
On onRefreshFail, the application can generate a new accesstoken and pass it back in callback.updateToken. The SDK will re-login and continue operation.
JWT-token login authenticationDelegate
BrandMessenger.getInstance(this).setJWTAuthenticationDelegate(this);
@Override
public void onRefreshFail(KBMJWTAuthenticationDelegateCallback callback) {
        callback.updateJWT("jwt", "userId");
}
On onRefreshFail, the application can fetch a new jwt-token and pass it back in callback.updateToken. The SDK will re-login and continue operation.
Alternate Auth flow using Customer iDP

Updated almost 2 years ago